Milk Jug Igloo

lens9166701_1264365171Milk-Jug-Igloo_2028

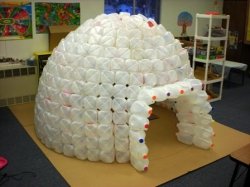
This is what we learned when building a milk jug igloo for the classroom:
  1. Promote Jug Collection – Our milk jug igloo took more than 400 milk jugs. That’s a lot of milk — and orange juice, water and so forth. We put up posters signed by the children and inserted a notice in the school’s print and e-newsletters in order to get the entire school of 100 students to help the collection effort. In addition our teenage sons liberated milk jugs from recycling bins in various areas of the city during their appointed recycling day. A parent also helped out by collecting jugs daily from a local coffee shop, which was an excellent source. It took us 3 weeks to get all the jugs we needed.
  2. Wash Jugs Well – You’ll want to wash the jugs well as they arrive, or your classroom will begin to smell pretty bad — and you’ll be teaching a lesson on microbiology instead of snow. We strung the jugs in groups of 10 and stored them in a corner of the room.
  3. Use a Cardboard Base – Using a cardboard box as a base will give your igloo stability as you glue the first row down. You can get a large box from your local big box or appliance store on delivery day. A refrigerator box works well.
  4. Use HIGH TEMPERATURE Hot Glue – You’ll need a HIGH temperature hot glue gun and HIGH temperature hot glue to put everything together. The Inuit call it an “iglu,” which is appropriate because you’ll use lots of hot glu. We used about 80 long sticks, which cost about $12. We only had a low temperature gun, so we had to buy a new dual temperature gun. That was about $14 on sale. So our total igloo investment was under $25. Because of the dangers of getting burned, the children played a limited role in the actual construction, but there was still plenty for them to do with counting, graphing, making patterns out of the lids, washing and so forth.
  5. Collect Extra Caps – Most milk jugs we collected didn’t come with their lids. You may want to start early collecting just caps so that you have enough to make patterns and decorate the final result.
  6. It Takes Time –

This is a big project and it is so worth it!

We used our igloo all winter long as a calming book nook for one or two kids to ‘get away’. We had a couple of accidents where the igloo was damaged. No worries! It is easy to fix with hot glue and so explaining to kids that our igloo is like our home and we must keep good care of it.

As the winter came to a close and the spring air  was warming up… I saw a chance to continue learning with our igloo. Our igloo was going to ‘melt’. We changed the focus of the igloo to recycling and how we could reuse our igloo.

REDUCE, REUSE and RECYCLE

This project can change and morph to whatever your theme is… just think outside the box!
Bubble Domes

IMG_4084

Materials:

  • Dish Soap
  • Water
  • Straws
  • A wet table
  • Toys

Directions:

Wet down a table. Have the soapy water mix in a location that the kids can get to without spilling. Dip the straws in the soapy water and place at an angle touching the table and blow.

Blowing a large bubble may take time and a big slow breath. Practice!

Dip the toy in the soapy water, then slide the toy slowly inside the bubble!

This is fun for teachers and kids. However, it may not be for everyone! Must teach blowing bubbles and not sucking them in… as well as, this is a patience game. It does not work every time.

Flubber

Flubber 1

Materials

  • Elmers Glue (8 oz bottle of Elmers Glue-All)
  • Borax
  • Large mixing bowl
  • Plastic cup
  • Spoon
  • Measuring cup
  • Food coloring
  • Water
  • Paper towel
  • Zipper-lock bag
  • Water

Directions:

  • This recipe is based on using a brand new 8 ounce bottle of Elmer’s Glue. Empty the entire bottle of glue into a mixing bowl. Fill the empty bottle with warm water and shake (okay, put the lid on first and then shake). Pour the glue-water mixture into the mixing bowl and use the spoon to mix well.
  • Add a drop or two of food coloring.
  • Measure 1/2 cup of warm water into the plastic cup and add a teaspoon of Borax powder to the water. Stir the solution – don’t worry if all of the powder dissolves. This Borax solution is the secret linking agent that causes the Elmer’s Glue molecules to turn into slime.
  • While stirring the glue in the mixing bowl, slowly add a little of the Borax solution. Immediately you’ll feel the long strands of molecules starting to connect. It’s time to abandon the spoon and use your hands to do the serious mixing. Keep adding the Borax solution to the glue mixture (don’t stop mixing) until you get a perfect batch of Elmer’s slime. You might like your slime more stringy while others like firm slime. Hey, you’re the head slime mixologist – do it your way!
  • When you’re finished playing with your Elmer’s slime, seal it up in a zipper-lock bag for safe keeping.

Caution! This is a great way to pass and keep germs in your classroom! Solutions… clean hands, limit times uses, make individual flubber for each student… so on. 

Mixing and Making Colors

612-302x198

Directions:

  • Fill 2 cups with water, add blue dye to one cup and yellow dye to the other.
  • Put an empty cup in between them.
  • Roll 2 paper towels.
  • Place the end of one towel into the blue dye and one end of the other towel in the yellow dye.
  • Bend both the towels and put the loose ends into the empty cup and watch the magic happen.
  • As the coloured water is absorbed in the towel it makes its way up and then into the empty cup.
  •   The blue and yellow food dyes combine making green water.

Use other primary colors to make secondary colors and so on!

Bringing Home a Baby Bumble Bee

Unknown-5

I’m bringing home a baby bumblebee,
Won’t my mommy be so proud of me,
(Cup hands together as if holding bee)

I’m bringing home a baby bumblebee,
Ouch! It stung me!
(Shake hands as if just stung)

I’m squishing up the baby bumblebee,
Won’t my mommy be so proud of me,
(‘Squish’ bee between palms of hands)

I’m squishing up a baby bumblebee,
Ooh! It’s yucky!
(Open up hands to look at ‘mess’)

I’m wiping off the baby bumblebee,
Won’t my mommy be so proud of me,
(Wipe hands off on shirt)

I’m wiping off the baby bumblebee,
Now my mommy won’t be mad at me!
(Hold hands up to show they are clean)

Props:

Materials:

Paper

Markers

Popsicle sticks

Directions:

Print or cut out hands, pants, bees, and splats. Glue the  two sets of hands to the sticks. Glue a bee to one set and glue the splat to the other. Print or cut out pants. Laminate all of it to keep it longer!

summer 2010 027-web


Morning Start-up

starts_heart_general

QUICK LINKS:

Purchase this CD: http://consciousdiscipline.com/store/pc/It-Starts-in-the-Heart-6p5.htm

Every Morning I start my circle time with standing, dancing, and singing! This is the CD  I use.  It is apart of  Conscious Discipline  by Becky Bailey. My first song I use is Track 2:  Get Ready!

 TRACK 2 Get Ready:

This song provides actions and I have added my own to keep the kids busy the whole time!

TRACK 6: My School Family

I use this track second. It also has actions provided, waving to friends, shaking hands, hugging, etc. I have again added movement to the parts that do not have actions provided by the song. I use the track to teach sign language. We sign school and family.

Signs:

Unknown-4

School

family-post

TRACK 4: That was Helpful

I use this track as my clean up song instead of yelling over the voices during free play… I simple walk over and turn on the song and help kids pick up. Way easier!

Solution Kit

img_2500-1-e1360182429999

QUICK LINK:

Large Solution Kit Printable Cards

http://csefel.vanderbilt.edu/modules/2006/solutionkit.pdf

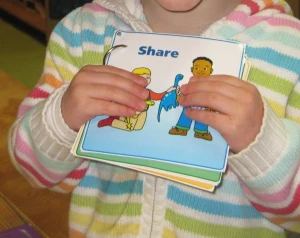
This is another amazing tool provided by CSEFEL program. I have this as a laminated book in a special spot  that the kids can grab anytime there is a conflict. This book helps children find a solution with common classroom conflicts by giving them options. It is also a time saver. When tattling is a problem and you are always sorting out interpersonal conflicts…you can teach your children to go to the solution kit first and then if they can sort out a reasonable solution there is a card just for “Get the Teacher’.